
Last updated on July 7th, 2023 at 01:34 pm
All of our reviews are based on exhaustive research, industry experience and whenever possible, hands-on testing. When you make a purchase using one of our chosen links we’ll get a small percentage of the proceeds. This supports the site and keeps Jeffsetter running. You can read more here.
Summer trips can be great fun, the sun is out and the ocean is calling, but then your air conditioner starts to sputter out. After even a few minutes, the heat inside of your RV can feel suffocating.
Knowing how to troubleshoot, defrost and recharge your air conditioner is vital for comfortable travel. Recharging the AC can seem an especially daunting task if you’ve never had to do it before.
So, how do you recharge your RV’s air conditioner?
If your RV’s air conditioner needs recharging you’ll need to determine the type of refrigerant it needs first. Before you start working remember to turn off the power, then open up the unit and pour in the refrigerant. After this, you’ll want to do regular maintenance on your unit to keep it in good shape.
This article will explain in detail how to figure out what’s wrong with your RV’s air conditioner, how to recharge it, and whether it actually needs it.
How to Recharge Your RV’s Air Conditioner?
Recharging your air conditioning unit refers to the process of replacing or refilling its refrigerant. RV air conditioner units aren’t typically built to be messed with, so you’ll want to be careful when doing this.
Consult your owner’s manual to figure out the exact type of air conditioner you have and its specifications before continuing. Some units, like Dometic RV air conditioners, are not recommended for DIY recharging and you’ll want to get a professional to weigh in.
After this step-by-step guide, you’ll find a list of problems to test before recharging your air conditioner. It’s possible that your air conditioner isn’t working properly because of an easier-to-solve problem and you’ll want to exhaust all of those possibilities before recharging your air conditioner.
Once you’ve figured out that you can do this project safely on your air conditioner, follow the steps below.
1. Buy Refrigerant & Supplies
You might be tempted to buy just any kind of refrigerant, but I recommend buying the exact kind as referenced by your owner’s manual. If you don’t have the manual, you can reach out to an RV dealer and they should be able to provide the information for you.
If your RV isn’t already equipped with a refrigerant gauge, you might need to set this up by installing a tap line. A tap line is a mechanism that you place in your refrigerant line so that you can attach a refrigerant gauge to it.
2. Shut Off Power
Once you’ve purchased your refrigerant, make sure you cut all power to your air conditioning unit. This is necessary to avoid a nasty shock when you go to replace or refill the refrigerant.
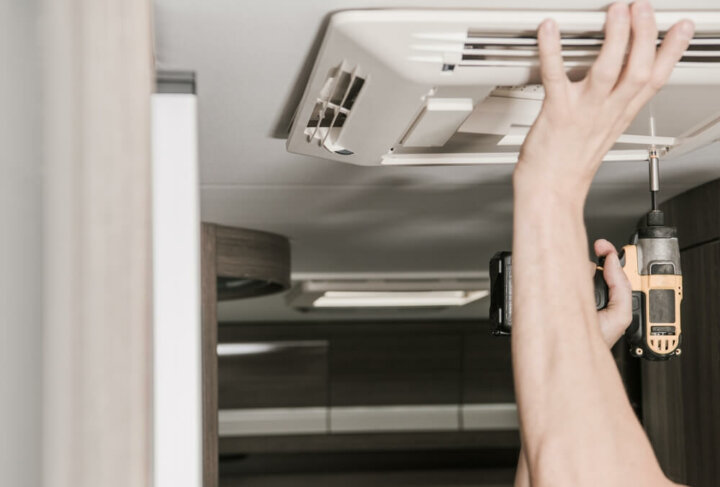
3. Open Your Air Conditioner
The air conditioner needs to be opened up if it even can be. How you open the unit up will depend on the kind of unit you have. This is another case of wanting to reference your owner’s manual.
You may be able to do a visual check on the unit to figure out how it opens. There might be clips or clasps on the lid that you can unhook.
When removing the lid, you should also be mindful that bees and wasps like to build their hives inside. If you do run into any nests or hives, make sure you remove them before continuing.
4. Check the Levels
Use a refrigerant gauge to see where the levels of your refrigerant are. As I mentioned before, this can be easy or difficult depending on the kind of air conditioner you have and you may need to install a line tap.
If your gauge registers below 30 or 40 degrees then it is probably low. If they are not below normal, it’s time to go back to the drawing board to figure out what else might be wrong with your unit.
5. Add the Refrigerant
Adding the refrigerant needs to be done carefully. Pour it in slowly, taking your time, until it is full.
You can do this while the unit is on, and have a friend inside of the RV checking the air temperature levels. There should be a noticeable difference in the temperature inside of the RV. The difference between the air in your RV and the air in the air conditioning unit should be about 20 degrees.
Turn the power back off after you’ve completed this step. It may seem redundant, but when working with electricity you should always take extra precautions.
6. Put It Back Together
Make sure to put the lid back on tightly as well as the coolant port cap using a wrench.
7. Turn It Back On
You should feel comfortable restoring power to your air conditioning unit now. After adding new refrigerant you should closely monitor your air conditioner to make sure it’s working properly.
If it’s still not working, you may need to reach out to a mechanic to find out what the issue is and get it fixed correctly.
If you find out that your air conditioning unit needs replacement, we reviewed the most efficient air conditioners for your RV in a previous article.
How Do You Know if Your Air Conditioner Is Low on Freon?
Freon is often used interchangeably with refrigerant. It’s a trademarked name for a refrigerant, and typically refers to a specific type of air conditioner freon known as R-22. This type of freon is actually no longer allowed to be produced or imported into the United States.
I want to point out that while the name is used in this article, it refers to the generic term and not the specific product.
Above we went over how to recharge your air conditioner by adding refrigerant. Here we’ll look at a few ways you can tell if your air conditioner is running low or freon/refrigerant.
Use a Gauge
We discussed installing a tap line to use a gauge when recharging your air conditioner. This can also be used to tell you if you are low or not. As I mentioned above, only install one if you are confident in your abilities, otherwise, call a professional to do the job for you.
Low Airflow
If you’re low on freon, you might notice that your air conditioner doesn’t blow as hard as it used to. If it’s very low, you may even notice that you have no airflow at all.
Warm Airflow
In my opinion, warm airflow is even worse than no airflow. The last thing I want when I turn my air conditioner on to cool down is a blast of warm air. If you experience this, then you are likely low on freon.
Ice Buildup
Ice buildup happens when you are low on freon because there isn’t enough of the refrigerant flowing through the coils of your air conditioner to cool down the warm air from outside as it flows around the cold coils. This forms condensation that will freeze over.
There are a few other issues that can cause ice to form inside of your air conditioning unit which are detailed later in this article.
High Electric Bills
Being low on freon makes it so that your air conditioner runs less efficiently. It will need to be on longer and more frequently to get as cool as you want it to, which results in higher costs over time.
Long Cooling Time
Long cooling time goes hand in hand with other signs of low freon in your air conditioner that we mentioned above.
If it’s sputtering out little bits of hot air and working less efficiently, you can definitely expect your air conditioner to take a much longer time to cool off your RV than it would if you were topped up with freon.
How Much Freon Does Your Air Conditioner Need?
RV air conditioners need some kind of freon or refrigerant to run. Without it, you would have an air conditioner that doesn’t work and only puts out warm and even hot air.
You might not be sure how much freon or refrigerant you need or what kind to purchase when you’re looking to recharge your air conditioner.
Typically, an RV air conditioner will use between 2 and 4 pounds of refrigerant per ton of power. A smaller unit of 2 tons of power would need 4 pounds of refrigerant and so on. I would always recommend looking in your owner’s manual for guidelines for your specific air conditioner
Trouble Shooting Before Recharging
Before going through the trouble of recharging your RV air conditioner, make sure that it isn’t one of these easier-to-fix problems.
Dirty Filter
This is probably the most common problem you’ll face with your air conditioner and luckily it has a simple solution.
Cleaning or replacing your dirty air filter when you find out this is a problem is important because a dirty air filter can lead to some bigger electrical problems that can damage your RV. Not to mention a dirty filter means you’re breathing in dirty air, which can actually make you sick.
If you have a reusable filter you can clean it in a couple of different ways.
One method is to vacuum it. Be gentle, you don’t want to dent or break the filter. I would use a low setting and if you have a brush nozzle, put that on before starting.
You can submerge the filter in a mixture of lukewarm water and mild detergent or dish soap. Agitate the filter after you’ve placed it in this mixture so that it’s completely covered. Then use a soft brush to clean the surface of the filter.
You’ll want to disinfect your filter after you’ve cleaned the dirt and debris from it. To do this, just spray a mixture of white vinegar and water onto the filter.
Let your filter air out for a few hours before putting it back into your RV’s air conditioner.
Freezing Up
Your RV air conditioner might show signs of freezing up, which means that it’s developed frozen chunks of ice inside of the unit. You may notice some condensation and water dripping from the unit when this happens.
There are a few reasons why this might occur.
Your refrigerant levels might be too low or even empty. Replacing the refrigerant is what is referred to as recharging your air conditioner, which this article talks in-depth about.
Dirty air filters can also cause this issue, as can high humidity, bad flow dividers, dirty condenser coils, and broken thermostats.
We’ve already touched on air filters. Humidity can be combated with a dehumidifier, and by running your fans on high when you’re in high humidity climates.
Bad flow dividers or baffles keep the hot air separated from the cold. If they are positioned or sealed improperly then the cold air can leak into the hot air and cause ice to form. You can reposition and reseal the flow divider with HVAC foil tape.
Dirty evaporator or condenser coils can also cause freezing in your air conditioner unit. Cleaning these is a bit involved, but the basic steps would be to shut off power, open your air conditioner unit, and then vacuum and clean the coils.
The video below is a great guide on how to clean these coils.
Broken thermostats can cause this problem as well. If this is the case, you’ll want to replace your thermostat.
Air leaks
Air leaks can cause a lot of problems with your air conditioner. To test if you have any air leaks, you should remove the cover and inspect your air ducts for any holes or cracks. If you find them, HVAC tape can solve the problem pretty easily.
Consider Defrosting Your Air Conditioner
Before you can do just about anything to fix your air conditioner, if you’ve been dealing with it freezing up then you’ll likely need to start by defrosting the unit.
To do this, remove the cover inside of your RV and turn on the fan. Note, don’t turn on the cold air, just the fan.
Let the fan run on high in order to melt the ice. I recommend using a bucket and plenty of towels to catch the water as it melts. After the ice has all melted away, you should let it dry overnight before starting your repairs.
Regular Maintenance
Making repairs to your RV’s air conditioner is no easy task. There are a lot of things to consider before recharging your air conditioner or testing for other problems when it’s not running smoothly.
Performing regular maintenance on your air conditioner will help prevent these issues from building up.
Keep It Clean
The air filters in your air conditioner unit are important to keep clean and well maintained. I went over how to take care of them briefly earlier on in this article.
This short video goes over how to clean the air filters and gives a couple of extra tips.
This type of maintenance on your air conditioner is easy and inexpensive. I would try to clean the filters at least once every camping season. It’s not a bad idea to do the same with the condenser and evaporator coils.
The other parts of your air conditioning unit that will need cleaning include the motor, the fan, and the fluid lines. It’s easy for these parts to get rusty and dirty while you travel.
Conclusion
You’ll want to keep your air conditioner unit in your RV running smoothly all summer to avoid uncomfortable or even dangerous travel.
Proper maintenance is key in making sure it runs well and keeps you cool. In addition to this, knowing how to fix minor problems and recharge your air conditioner is vital in owning an RV that can run comfortably in the summer months.