
All of our reviews are based on exhaustive research, industry experience and whenever possible, hands-on testing. When you make a purchase using one of our chosen links we’ll get a small percentage of the proceeds. This supports the site and keeps Jeffsetter running. You can read more here.
If you’re looking to stay in your travel trailer for an extended period, it will be a far better experience if it isn’t rocking with every step you take. Putting a travel trailer on blocks is a way of bringing stabilization to the trailer and if done correctly, you can get the trailer leveled perfectly too. No more coffee cups sliding down the countertop!
So, how do you put a travel trailer on blocks?
To put a travel trailer on blocks, first, create level ground, then lower the front of the trailer and stack the blocks underneath the rear of the travel trailer. Next, lift the front of the trailer and repeat the block stacking process evenly on each side, according to the size of your travel trailer.
Putting your travel trailer on blocks is important, not only because you will be creating a more stable space for anyone who may be using the trailer whilst it’s off the road, but the wheels will also no longer be bearing the full weight of the trailer.
This process can be daunting, especially if you’ve never leveled a trailer before, so let’s look at the method in a bit more detail.
What Do You Need To Put A Travel Trailer On Blocks?
Before going ahead and starting to stack blocks to put the trailer onto, you need to gather the right equipment to get the job done. Having the correct tools will make things far easier further down the line.
1. Strong Jack
You may need more than one jack depending on the size of your travel trailer, and it’s crucial to use ones that can handle the weight of the trailer. Many RV owners like to use hardwood underneath the tongue jack which can be useful if you are on questionable ground.
2. Leveling Blocks
There are plastic leveling blocks on the market, but you can also use wooden blocks, just make sure either of these options can handle the size and weight of the vehicle. If your RV is too large, then the wood or plastic blocks might not be a safe option for you to use.
There’s also the option of using cinder blocks, these are usually made out of concrete and they are great to use underneath your travel trailer to bring strength and stability. Cinder blocks are hollow, and this is one of the characteristics that makes them so durable and weight-bearing.
3. Solid Ground
Arguably one of the most important parts of this process is the ground you are using to park your travel trailer. The ground ideally needs to be solid so it won’t sink under the weight of your travel trailer.
4. Spirit Level
It’s wise to use a spirit level to work out if the ground where you’ll be putting your travel trailer is level. Ground that’s not level will lead to a trailer that’s unlevel too, so it’s best to have a spirit level to hand.
How Do You Put A Travel Trailer On Blocks?
There are several steps to the process of putting a travel trailer on blocks and each one is important and shouldn’t be skipped. Before you begin, make sure everything is packed away inside the trailer, along with closing any drawers or cupboards.
When the trailer is being moved and tilted, things can fly about everywhere inside, creating a mess and potentially even some damage. We all know that dreadful noise of things falling out of an unlocked cupboard whilst on the move!
It also may be worth asking friends or family for some help when putting your travel trailer on blocks as the process needs to be done correctly to avoid any damage coming to the trailer or ending up with a very unlevel camper.
Step 1: Dig and Create Level Ground
Once you’ve decided where you want to park your travel trailer, you’ll need to dig the ground and create a level area. It’s frustrating to be on unlevel ground, especially long-term, so using a bubble spirit level or something similar will make sure everything is leveled perfectly.
Step 2: Lower the Front of the Trailer
Bring the jack to the points on the frame near where you will be working as it’s time to start getting the trailer onto the blocks. Once you’re happy the ground is level, use the jack to lower the front end of the trailer which in turn will raise the back end.
It may be useful to have another set of eyes here to help guide how far the back of the travel trailer needs to be raised.
Step 3: Stack Blocks
You can then go ahead and start stacking up the blocks under both sides at the back of the travel trailer. Placing the blocks in different directions for each layer can help improve overall strength which will aid the blocks in taking the weight of the trailer. Stacking the blocks vertically and interlocking them as you create layers will also increase their strength.
The blocks need to be used at each corner as well as on both sides of the trailer in front and behind the axle. Be sure to space the block stacks evenly apart to distribute the weight of the trailer.
If you’re using cinder blocks then wood such as thick plywood can be used on top of the final cinder block layer as a spacer as this is the point where the frame of the trailer will come into contact with the blocks. Be sure to not use a piece of wood that’s too big or thick as this could potentially end up making the travel trailer unlevel.
Step 4: Raise the Front End of The Trailer
The front end of the trailer can now be raised back up, but you’ll need to lift it a little higher than the back of your trailer. This will allow you to continue putting the rest of the cinder block stacks underneath.
Step 5: Add Another Block Stack
Another block stack can be built under the travel trailer, where the trailer will need additional support. The number of block stacks you’ll need to use will depend on the length of your travel trailer. Make sure the block stacks don’t end up interfering with any critical components that might be underneath the trailer such as gas pipes.
If you are planning on using your travel trailer whilst stacked for a long time and the ground beneath the trailer isn’t fully solid, you may eventually need to re-level the trailer.
As you can see in the detailed demonstration video, the process is simple but requires a considerable amount of time and effort. If you reach a point and start to get impatient, just remind yourself of how good it will be to have a stable and level travel trailer!
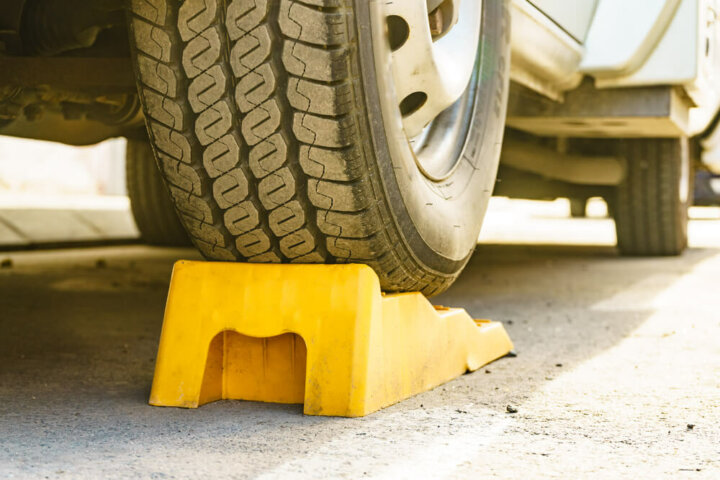
Do You Need Leveling Blocks For a Travel Trailer?
Regular RVers will know how frustrating it is when you reach a dreamy spot but it’s unlevel and no matter how hard you try, you can’t find a flat spot to park. Although you could in theory store an RV that’s not level, this isn’t wise as it can lead to problems with internal components and generally make life unnecessarily difficult.
Cinder blocks are great for a more permanent set-up option, and you could make your own leveling blocks made from wood, but for those who want to take their trailer to various sites and maybe even some wild park-ups, plastic leveling blocks may be more useful. They provide stabilization, even on slanted terrain, so you’ll no longer have the battle of getting your rig level.
What Are the Advantages of Using Leveling Blocks?
If you use your travel trailer regularly and want to have the luxury of a level spot every time you park up, leveling blocks might be the answer. Even if your trailer has electric jacks, they may not solve the problem if the spot where you’re parking has a dramatic slope.
1. Improves Comfort and Functionality
Being able to park your RV level will make for a far more enjoyable experience, as you won’t be walking on a slope or having to stop things sliding around on tables and countertops. When I first started out living full-time in a camper, being parked on a lean didn’t massively bother me.
However, after moving into a camper with my partner, I quickly realized parking level was a necessity as we were rolling into each other during the night. No one likes unhappy campers and we both need our sleep, so leveling blocks were a must for us!
2. Reduces Potential Stress on The Trailer
Parking unlevel can increase the stress on the frame of your trailer, and if it is left unlevel for a considerably long time, the frame can twist and damage can be caused.
Having a level trailer will mean everything inside is working as it should. Water won’t pool and spill out of the shower tray, the frame will support the trailer correctly, and the cupboard doors stay closed.
3. Enhances Performance of Components
RV components such as fridges can be a nightmare if you’re parked on a slope. Many travel trailers have a two-way electric or propane fridge and these need to be level to function properly and safely.
Other features such as the fresh, gray, and black water gauge won’t be reliable if you’re not parked level, as any liquid will tilt in the direction of the lean giving an inaccurate reading.
What Are the Disadvantages of Using Leveling Blocks?
There are a few drawbacks with leveling blocks that need to be considered before buying a set. Some leveling blocks are made from materials that will break down over time and need replacing, whilst others have a hefty price tag.
1. High Price
Leveling blocks, although useful, can be quite expensive depending on the type of block you buy. Basic plastic chocks, for example, are often far less in price than an advanced leveler system block.
Although leveling blocks can be pricey, they may be worth the investment if you use your trailer regularly and want to have the best experience possible whilst also being comfortable in the trailer.
2. Heavy and Require Storage Space
Those regular to RVing know how important every last bit of space can be and what a difference it can make. Leveling blocks can be heavy and awkward to store as they take up considerable space.
If you have a travel trailer that’s on the smaller side, it may be hard to find a home for a set of leveling blocks unless they are compact and can hide away when they’re not needed. I always keep a space under the bed in my camper to store our leveling blocks, that way I know not to use the space for anything else, and my blocks always have a space to fit into.
3. Material May Not Last
Leveling blocks can be made from various materials from plastic to wood, and each material has its pros and cons. Thin plastic may become brittle over time and crack under the weight of a travel trailer, whereas wood may initially be strong, but will eventually break down and need replacing.
Closing Thoughts
Putting a travel trailer on blocks is a must if you’re looking to store your travel trailer for a while, and is especially important if you’ll be inside it too!
Using cinder blocks will keep your trailer level, secure, and stable, meaning you can walk around inside the trailer and there will be minimal movement. If you’re not sure how many blocks you need to use, my advice would be to buy extra and take back whatever you don’t use, as it can be hard to work out the exact number you will need.
Putting a travel trailer on blocks is a big job and needs to be done right or the results may be disappointing. It’s best to take your time and be patient as you need to ensure each stack of cinder blocks is the perfect height to stabilize your trailer.